SUSTAINABLE SOULS – JANUARY

15420812_10211857543819493_5584314132139072125_n
Around Christmas a dear artistic friend, Tina Walker,  called out to artists to participate in the Sustainable Souls Project. Matters and issues of the earth are real important to me and my family. We try to be as self sufficient on our farm and in our everyday life. So, it was important that I join in the Sustainable Souls Project! We have a series of topics every month for a year…………some will be more challenging than others. Some inspiring topics for January included Planet Earth, We are all Connected and Ecosystems. I decided to use the globe for my inspiration of the planet earth. Now…………the globe just did not make my project seem very full so I added trees and green raffia to represent ecosystems. Now………..I have my completed 8×8 page.

To create this page, I used a variety of artistic goodies! I watercolored the oceans then added light modeling paste for the clouds. The continents are painted brown with Waverly antique wax, light modeling paste and Color Burst sepia. For the frame, I used Deco Art green as the background then glued green raffia on top. My trees are cut out with a Cricut and covered with green Flower Soft. I cut out the title then covered it with Crackle Accent.

My page:

p1090069

My youngest son, Daniel, has decided to play along. He is also very interested in our environment. His project was inspired by the Ecosystem. He set about the circle of life. His project:

p1090068

I hope you enjoy our vision of this month’s theme! I know we had fun playing along!!!

I hope that we have inspired you to look at the environment in a slightly different way. Thank you for joining us!!!!!


Categories: Uncategorized | Leave a comment

2016 TOP TEN CRAFTING FAVORITES

2016 was a wonderful year………full of many challenges to my creative talent. A couple years ago, I joined this fantastic group of extremely creative ladies to create projects for several collaborations. I also took a couple of workshops, at my local scrapbooking store, to learn new mixed media techniques and challenge my skills and desire to keep things clean and in order. Adding layers and making a mess is real challenging for me.

Scrapbooking is my first love. I have learned to add mixed media to these pages to make them more cohesive. The subject of the three layouts, below, are our oldest boy and his beautiful bride. Wedding photos are so much fun to scrap!!!

p1070714

p1070637

p1070738

Several projects were completed from collaboration challenges. These collaborations are meant to challenge me as a individual.

One challenge was to use every piece from a kit (that was sent to everyone………..we all received the same thing). I decided to make a large scrapbook page that can be framed. This piece is to be used in our fair display.

p1080904

The next collaboration was to take items that would normally be trashed and turn them into a treasure. With the help of my husband………………we made a wooden outdoor cooler.

p1080769

While I am working on the last collaboration of the year………………….the Weaving collaboration was a fun one. I have never before used a loom. With a quick learning curve…………I wove this beauty…………complete with a needle felted sheep head.

p1080525

Two workshops gave me the opportunity to learn and practice new techniques.

p1080108

p1090015

Our favorite diner had a wooden spoon competition. The theme was fall. Mine is a old fashioned spoon with a pumpkin.

p1080938

While the above creative projects are favorites……………..my all time favorite is this lighted glass block. We decided to make glass blocks for our neighbors for Christmas. Hubby helped by adding the barn board frame.

p1080950

It has been fun reviewing all my creative projects…………..I love to share them with you all! I hope you have enjoyed looking at them. Hoping you all have a wonderful day!!!!!


Categories: Uncategorized | 6 Comments

TRASH TO TREASURE COLLAB

13567260_10153920185703621_605169623158881292_n

A couple of months ago, I joined a fantastic group of ladies in a Trash to Treasure collab. Of course we are having a blog hop to show off all our beautiful creations…………you can find others work on Facebook, too. Tina was the wonderful organizer………….check out her blog to get started.

If any of you know me well, you know I love to get creative making useful items. Approaching this challenge, I took a look around our farm to see what I could come up with. While we keep almost everything cleaned up, I was able to find a few goodies that had not made it to the dump or burn pile. A old barn door, a ruined cooler, a old duck faucet, some old square nails and some unused tile(from our neighbor). The handles, hinges, pull and tin sign are new as I could not get my hands on any used ones.P1080512P1080598P1080762

I have always wanted a outdoor wooden cooler………….oh yea, I can make it!!! With all these used goodies……..why pay $100.00 or more? Not me!  So…………I set about constructing this wooden cooler, with the help of my fabulous hubby. Am pleased with the outcome…………….I still need to attach the hinges and do all the tile work(we are learning this as we go). After all the tile is set and dried…………….I will be stenciling a black silhouette deer head on each grey/green tile.

So…………..my finished project!!!!

P1080769

Hop along with these other extremely talented ladies:

Tina Walker: http://adogslife-thirteen.blogspot.com/…
Mitra Pratt: http://mitralee.blogspot.com/2016/0…
Candy Rosenberg, A Vintage Girl: http://candyscraps.typepad.com/scra…
Christy Strickler, My Scrapbook Evolution: http://myscrapbookevolution.com/trash-to-treasur…-milk-jug-basket/

Robyn Crowningshield: https://cozienookhomestead.wordpress.com/2016/07/08/trash-to-treasure-collab/

Thank you for visiting my blog and hopping along with us!!!


Categories: Uncategorized | 5 Comments

ARTIST WEAVING COLLABORATION

13055380_10209722139075709_6248443967896571586_n

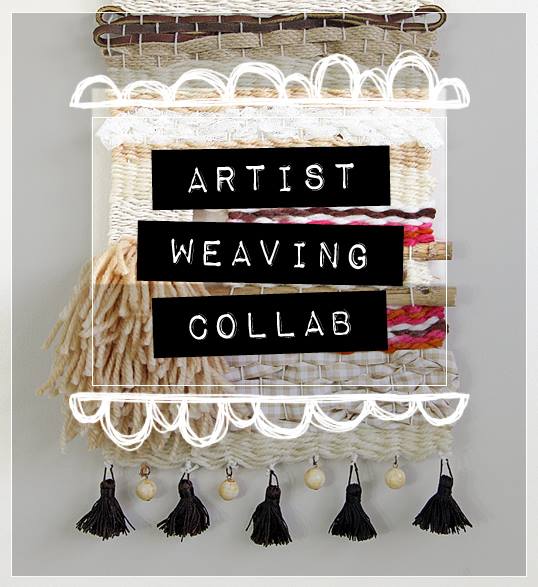
A couple months ago, a dear artistic friend, Tina Walker,  posed this collab. Several very talented ladies signed up………………including me!!! What fun!!!!! Now the planning stage………..hmmm, what to do? Where do I start?? I have never tried to weave let alone finish a project!!!!!

Fast forward to the end of March………………I am in need of a loom or something like it. Our little town of Ashfield has a group called Needles and Threads.  Out went a call for some help………………….I HAVE NEVER WEAVED BEFORE!!! Before long, a wonderful lady offered her loom and a few hints. I took her up on the offer. Picking up a Bekka table top loom, I was astonished that it was in pieces….Oh NO, now what? Fortunately, the directions were in the bag………..off I set to put it together. DONE! I read the instructions to get a idea of how to weave. I proceeded to get started. Weaving is a challenge! It took me three weeks to finish weaving my banner. I tore it apart two times as I did not like the way it was going together. I learned tons along the way!!! Like……..the warp yarn(up and down) needs to be thicker and stronger. It started to pull apart after I got halfway done. I had to splice it together several times. I also need to remember needle felting pulls the warf(yarn going sideways) tight making my piece look like it pulled together towards the top.

Thinking I will weave again but make my own loom.

Here is my finished weaving project complete with a needle felted sheep’s head. Another first for me! You know, I could not leave a blank space open…………..LOL!!!!

P1080525

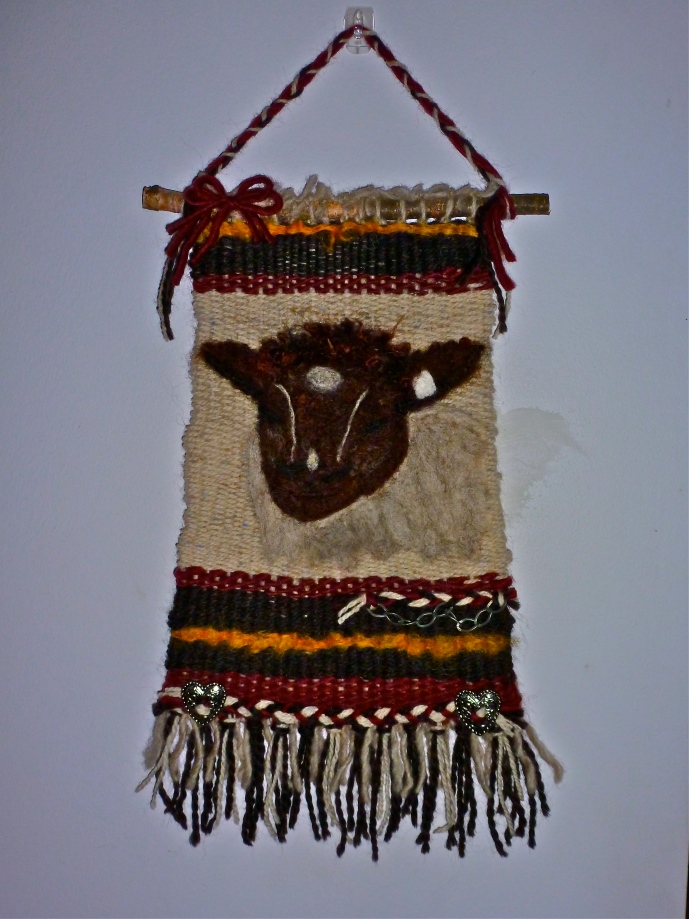
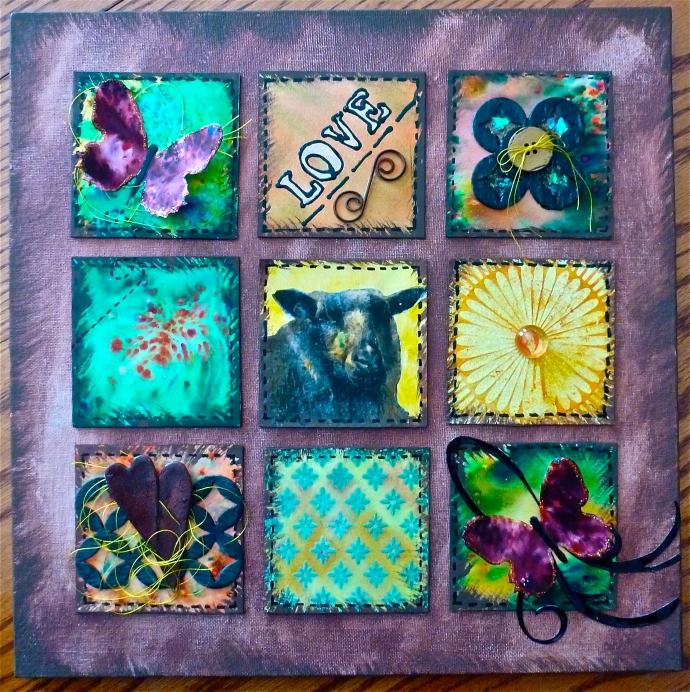
Here is a list of materials I used(including photos): Rug needle, needle felting kit, wool yarn from our sheep and bought( the grey, burgundy and brown wool is from our sheep and the unscoured cream wool is bought), twig, metal heart conchos, antiqueed metal chain and roving from our sheep(grey, white, brown, dark yellow and black).
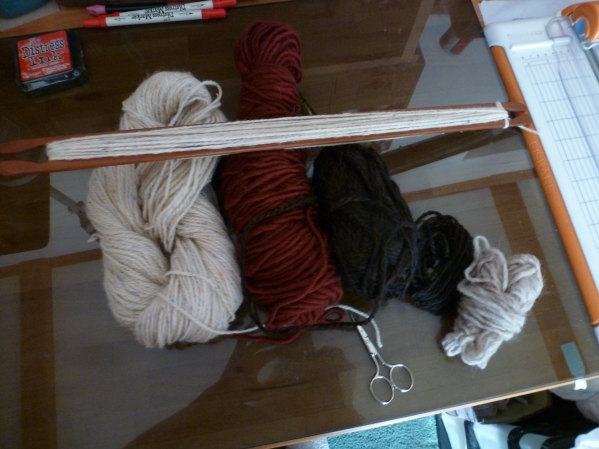
The woolen yarn:

P1080225

The needle felting kit:P1080246

The wool Roving:P1080262

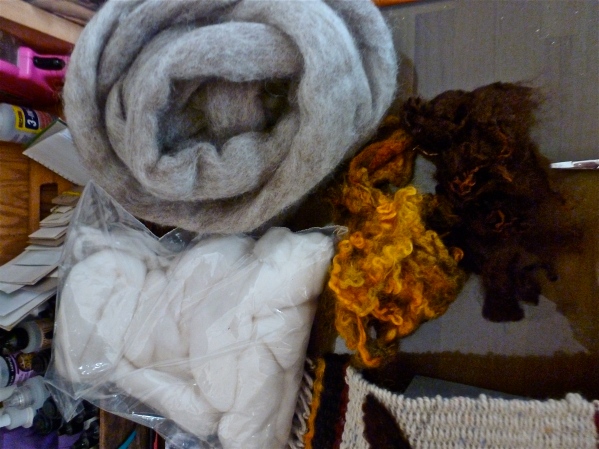
Weaving the different colored warfs with the rug needle…….just going back and forth. From right to left, I weaved through the warp. Then from left to right, I pulled the needle straight through. So, it is like over and under……..back and forth. I stopped and started colors by intertwining the colors together.P1080218

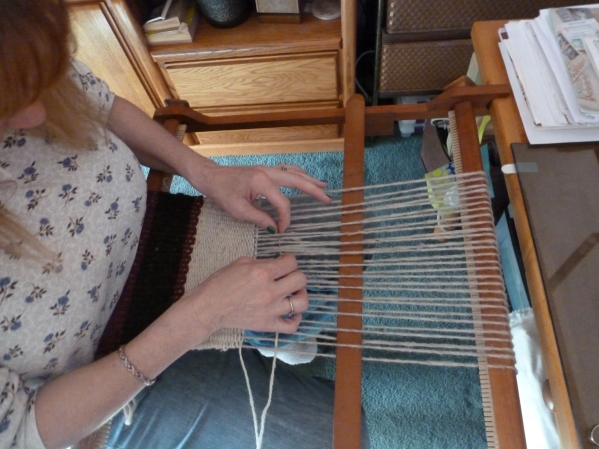
A shed stick helps separate the warp. You also use a shed stick to push the warf yarns together so there is no gaps.P1080221.JPG

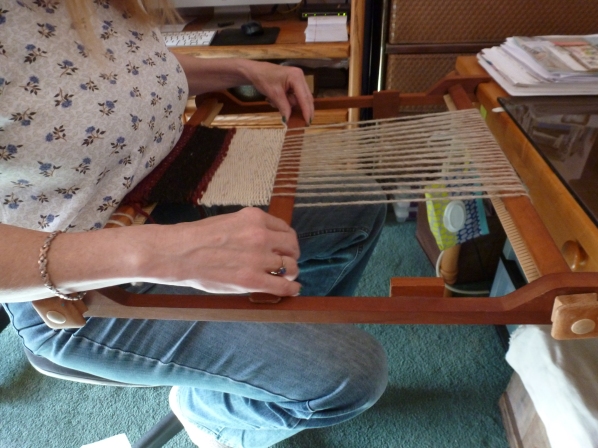
Now, on to needle felting the sheep head. This is from a photo of a ewe we owned. She helped build our flock into what it is today!!! I copied the photo onto heavy cardstock then fussy cut it out. I then traced the cutout with a Sharpie onto the banner. Then I started adding roving, piece by piece to fill in the lines. Using a special needle, I felted the roving in place. This needle has barbs, similar to fish scales……………sheep’s wool also has barbs, much like fish scales too. By going up and down with the needle………….you will mesh the roving together with itself and the wool yarn of the banner.P1080272.JPG

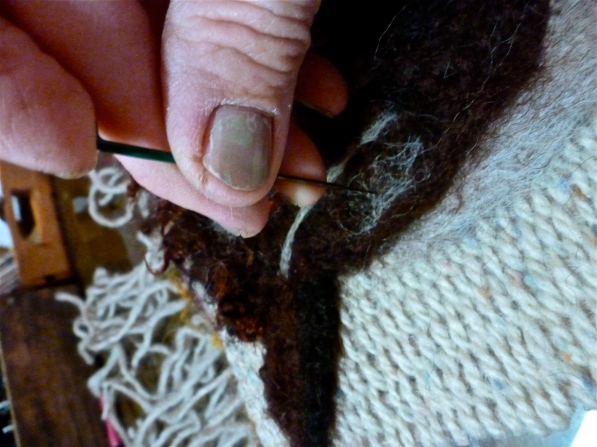
The different textures within this felted piece comes from layering different colors and felting some washed raw curly wool partially.P1080533.JPG

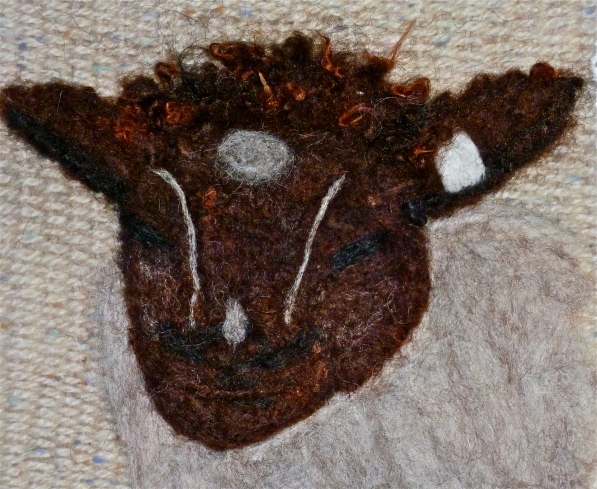
To finish the piece off…………….I braided three pieces of yarn(one for the hanger, bottom piece and small piece under sheep’s head). I added the metal pieces to the braids then attached them to the weaving using Beacon’s 3 in 1 glue.

I have a lot of fun with this piece……….love the way it turned out!!!

Please join me in this fabulous weaving blog hop……………….if you started on my blog, you need to visit Tina Walker’s blog. It has been a honor to be among the bloggers!!!!

Martha Richardson:  ;http://themermaidscloset.blogspot.com/…/raise-your-hand…
Beth Soler: http://scrappingwonders.com/weaving-art-fun
Albion Gould:  http://wp.me/p57foU-1zx
DeeDee Catron:  http://deedeecatron.blogspot.com/2016/04/lets-weave-baby.html
Laura Mooney:  http://happinessequalscreation.blogspot.com/2016/04/artist-weaving-collaboration.html

Mitra Pratt:  http://mitralee.blogspot.com/…/weaving-collaborative…

Susan M Brown: http://sbartist.blogspot.com/…/cre8time-new-beginnings…

https://melsartjournal.wordpress.com/…/weaving-artist-coll…/

Thank you for visiting my blog!!!!! Enjoy your day!


Categories: Uncategorized | 5 Comments

FOR THE LOVE OF MIXED MEDIA BLOG HOP

Wow…….it has been awhile since I shared with you all!! Life has gotten in the way…..almost everything fun and relaxing has taken a back seat. One of the new additions to our family and farm…………KEELEY………..has taken up so much of our time. Training her has become almost a full time job, knowing it will be all worth while in the end.

About a month ago, Christy Strickler proposed a mixed media blog hop. Several incredibly talented ladies jumped on board. Of course, I also wanted to play and learn(along the way). The mixed media blog hop was formed. If you come upon my site first, you need to go to  Christy Strickler’s blog to start hopping. You will see several fantastic projects along the way!!!!!

With Valentine’s Day close, I had a “love” project in mind…………..but, it did not pan out as I have not been able to get my hands on old chicken and barb wire……………..so it was put on hold.

A couple of weeks ago, I took a workshop at Life’s Memories and More in Palmer, Mass. Tanya operates a wonderful scrapbook store and offers many workshops. The workshop was instructed by no other than the very talented Jen Starr. She is a designer, instructor and mixed media artist. Oh my…………..so many “new” products………..ones head is spinning!!!! Colorful Concoctions did not disappoint!!! We learned image transfer, played with Colorburst and other new goodies. From this three hour workshop and several hours at home, finishing it up…………..came this wonderful piece.

P1080108

This piece, a tribute to our passed friend(yes, she is a sheep but contributed so much to our farm and lives). I used shades of yellow, green, brown, burgundy and oranges as they are my favorite colors………….

Some techniques I used: diecutting and rusting soda cans, stamping, faux stitching,  inking, painting then shading, stenciling and image transfer.

I used gesso, Colorburst, Dylussions brown paint(I love this stuff), Adirondack espresso paint, yellow Stickles, chipboard, 12×12 canvas,black Enamel Accents, black Pitt pen, yellow thread, soda can, Dusty Attic rusting powder, button, heart and swirl dies, clear bobble, Perfect Pearls from Ranger, Viva Decor glitter paste and dimensional flakes.

Please hop along and check out the other fabulous projects from these talented ladies!!!

Christy Strickler: http://myscrapbookevolution.blogspot.com/2016/02/for-love-of-mixed-media-blog-hop.html

Categories: Uncategorized | 6 Comments

PINE WOOD DERBY CARS

Making a Pine Wood Derby Car………………………hmmmmm, isn’t that for the Boy Scouts?? I remember my oldest making a couple of them and competing with them. That track was amazing!!! How fast did those little cars go………..WOW!!!! Now……….that was almost 12 years ago, yea, at least!!! With dad’s help, Tim had fun and did quite well competing!

Fast forward to today…………………………when asked who wanted to accept the challenge to make a mixed media car……………..guess who raised her hand??? YUP, that would be me!!! I love to explore the world of mixed media……even though I am still learning! What a way to combine the two………..mixed media and a Pine wood Derby Car. All the cars needed to start out  alike…………but, that is where the likeness stopped! After lots of thought, I decided I wanted to construct a pullin’ tractor…………….a mixed media pullin’ tractor!

Hubby cut both ends off to make the main part of the body with his chop saw. A first for me was forming the modeling clay to make fenders, seat and weights. While the clay was drying, The main part of the body was rotated so I could use the largest part as the hood of the tractor. I took to whittling down and rounding the hood. My paint job came out rough as I mixed together green gliitter and the Tim Holtz forest mass paint. Different but I like how it came out! I used a few pieces that came in the derby car kit……………the engine block, screws and muffler pipes. I altered these pieces by rusting them. I added the bling at the end to glitz it up, some! Of course, I needed to have a driver…………………the lambie fit the bill!!!

Here is my PULLIN’ TRACTOR:

Screen shot 2015-03-24 at 8.48.36 PM

Screen shot 2015-03-24 at 8.49.33 PM

Screen shot 2015-03-24 at 8.49.15 PM

Screen shot 2015-03-24 at 8.48.53 PM

      What a fun project!!! Hope you enjoyed checking out my Pullin’ Tractor.

Wanna see more fantastic cars???? Check out these blogs:

<!– start InLinkz script –>

<a rel=’nofollow’ href=”http://new.inlinkz.com/luwpview.php?id=509145″></a&gt;

<!– end InLinkz script –>

Thank you for visiting my blog today……..hope to see you again!!!!

Categories: scrapbooking | 7 Comments

DISTRESSING

I have been asked soooooo many times “how did you do that”?

Distressing……….hmmmm………it is not as easy as it looks! I have been perfecting it for five years, now and still am not able to do it like the pros. I am learning a little at a time, though.

Well………….I am going to try to show you how I  go about distressing. Remember….there is more than one way to get the look you want, you just have to give em’ a try. Practice makes perfect!!! I am sorry for the poor quality of the photos……….the youngest took these photos and is not that familiar with my camera………

Here are the tools I use to distress with: Tim Holtz distressing inks(I can not talk about how the other inks work as I only use the TH inks), distressor, Ranger blending tool and foam pads(there are two sizes….the one I have and a smaller round one…..I have that one coming), make up sponges, razor blade sandwiched between popsicle sticks.

Screen shot 2015-03-12 at 7.13.26 PM     1.) To ink the edges of the paper, I use a makeup sponge(wedge shaped). You can apply the ink pad directly to the edges but I find the sponge to be easier…………it also allows you to get a tiny bit of ink on the front of the paper.

Screen shot 2015-03-12 at 7.13.48 PM     2.) To give the paper a over all inked appearance, I use the Ranger blending tool and the sponge that fits it. Starting off the paper, you swirl in a circular motion…..onto the paper. This takes some time and practice to figure out how hard you need to press and how wide your swirls need to be.

Screen shot 2015-03-12 at 7.14.09 PM     3.) Tearing the paper is quite easy. I like to control my tears…………..keeping my fingers close to where I tear. Please note that if you tear the paper up with your right hand……………you will get the white or core of the paper facing up. You can ink the tears with the TH blending tool or leave them plain.

Screen shot 2015-03-12 at 7.14.32 PM     4.) Next up is distressing the edges. If you use the distressing tool, you will get a fuzzy look. I pull the tool toward me while holding the paper close to the edge. You can ink the underside and edges of the paper first to get a different look.

Screen shot 2015-03-12 at 7.14.54 PM    The youngest made me a tool that would tear the paper while I ran it along the edges. It is made from a razor blade and four popsicle sticks. I use it the same way as I do the distressing tool.

Screen shot 2015-03-12 at 7.15.15 PM     5.) The latest type of distressing I learned id rolling paper. This opened up a new world for me! To achieve the look of rolled paper…………….I tape the paper to the page…..running the tape about an inch from the edges. I get the paper slightly wet underneath( I use my finger and spit). Then I start rolling the edges…………I place the paper so I am rolling it towards me. I might tear the corners off or might roll them. To get that deep tear…………just rip towards the center. You can leave it there or completely remove it……then roll.

Screen shot 2015-03-12 at 7.15.44 PMScreen shot 2015-03-12 at 7.16.05 PM

Screen shot 2015-03-12 at 7.16.45 PMScreen shot 2015-03-12 at 7.17.04 PM

This is a display page of all the ways I distress paper……………paper that will go on my LOs.

Screen shot 2015-03-12 at 7.16.30 PM     I want to thank you for joining me in this distressing tutorial. I hope you pick up something that you can use.

Have a great day!!!

Categories: scrapbooking | 2 Comments

Layering

AHHHHH………..layering!

The dictionary describes layering as “a covering that is set between two levels.”  To me layering means many pieces of paper, lace, ribbons, embellishments, paint, inks or Washi placed on top of each other in a fashion that allows one to see a part of each element. I am going to try to teach you how I go about layering……..yes, there are many different ways to approach layering but this is how I do it.

1.) I collect everything that I might need for my project(putting together more than I really need). I will pick and choose the goodies  I want to use when I add the photos.

P10609152.) Next, I play with the paper…………………what pieces of pp or cardstock works with my photo/s. This is where I go to my scraps………..yea, use them up!  I just start placing(layering) the pieces in a pleasing order………..I have not started to create the shapes, yet. In this LO, I have decided to make thinner layers instead of using larger layers. Remember, you do not always have to use a square…………change it up and add rectangles, circles and triangles to your layers. If you have problems visualizing the different shapes you want to use……..make yourself some chipboard templates(keep them). Now start layering those templates till you are happy………….now cut out the paper.

Screen shot 2015-03-10 at 12.41.33 PMScreen shot 2015-03-10 at 12.42.07 PM


3.) Before you start placing the layers on your background……..let’s layer that background page. I love to stamp, ink, mist, use gesso or paint. It is all about adding one layer on top of another. So……let’s stencil on some gesso. Let it dry then stamp a pattern, lightly, around  the page. Add a few darker stamps on top of that. You wil probably want to color your gesso. Now lightly spritz some mist. Let all dry.

screen-shot-2015-03-10-at-12-43-05-pm

Screen shot 2015-03-10 at 12.43.23 PM


4.) One thing I do is as you remove the layers…one by one…..mark a corner. Try to mark it under the photo or another layer…….that way you can not see the marks. I do this so the pieces are placed exactly where I want them.Screen shot 2015-03-10 at 12.43.38 PM5.) Now start to add the pieces one layer at a time…………..attaching them with your glue or tape. P1060939P1060942


6.) After I get the layers adhered, I add the photos. I usually use pop dots as my layers make parts of the photo stick up of the page.

P1060943

7.) Now you can add your embellies and journaling………layer the journal behind the photo.

Here is my ending LO…………..complete with all the layers.

Screen shot 2015-03-07 at 3.49.31 PM

Categories: scrapbooking | 1 Comment

SAVE THE DATE

The inspiration for this LO comes from several places. A fabulous sketch from the Canadian Scrapbooking Magazine. Two mood boards………….the first from Creative Embellishments and then Scrap Around the World.

The fabulous sketch from the Canadian Scrapbooking Magazine:

10915337_1040898389260486_2203867447900695860_n

Creative Embellishments had a fantastic mood board! I love so many elements to get inspiration from. The swirls and sparkles drew my attention. They love to add twists……….well, February’s twist was to use a ombre effect. I achieved this with the different shades of green matting the photo. I use the burlap background and the leafy swirl chipboard pieces from Creative Embellishments. Of course, I altered them!!!

feb

Scrap Around the World’s mood board really sparked my creative juices. I absolutely love the color green!!! But………….WOW…………..look at the ombre effects within!!!!

SATW+2015+MB+2+TANYA+SIDORENKO

My LO a combination of all……………I am happy with the way it turned out!  I used all of my favorite scrappy goodness in this LO.

SAVE THE DATE…………………

Screen shot 2015-02-28 at 7.43.20 PM

Thank you for visiting my blog….I hope you have a terrific day!!!

A note to all…………..I am in the progress of updating my blog info…………please be patient as I work through this process.

Thank you in advance!!!!

Categories: scrapbooking | 8 Comments

RUSTING METAL

I love the look of rusted metal………….not sure why?  Maybe it is because  it means that piece has been around awhile…………..stood the test of time. Maybe because it reminds me of  someone that lived a time ago. Maybe because I love the aging process…………aged naturally. I have tons of rusted tools decorating my home and outside in the gardens. I especially love rusted milk cans, milk strainers and old buckets………yea, they do not hold liquid anymore but look good!

There is several ways to rust something but The method I am about to demonstrate is the easiest and quickest way. It takes me two days to rust soda cans and other pieces of metal. I only get to scrap in the evening, so I will apply the glue and powder then.

You will need: scissors(I use Fiscars Amplify for mixed media), Sizzix and the thick dies, exacto knife, softer paint brush, Rusting powder by Dusty Attic, spray bottle of regular vinegar, a catch tray or piece of paper to catch the powder and  decoupage glue.

Screen shot 2015-02-03 at 6.44.19 AMScreen shot 2015-02-03 at 6.43.16 AM


1.)Cut clean soda or beer cans using the exacto knife or scissors. You want to cut off the top and bottom. Discard both ends.

Screen shot 2015-02-03 at 7.29.12 AM

Screen shot 2015-02-03 at 7.28.51 AM


2.) Wipe the inside and outside well to clean all surfaces. I use heavy duty baby wipes. BE CAREFUL WHEN HANDLING CUT METAL…………YOU CAN GET CUT!!!!!! Cut the piece of metal with the Sizzix or by hand to make your shapes.

Screen shot 2015-02-03 at 1.09.01 PM

3.) Lightly sand the side you are going to rust. You want to just scratch the surface. Wipe down the surface again.

Screen shot 2015-02-03 at 7.30.19 AM     4.)Paint the sanded side with glue…………..covering the entire piece with a thick layer. I found that a softer paintbrush will not leave streaks on sanded metal.

Screen shot 2015-02-03 at 7.30.38 AM

5.) Immediately sprinkle the piece with the rusting powder………covering the piece completely. Turn over the piece and gently tap to let extra powder to fall off.

Screen shot 2015-02-03 at 7.31.19 AMScreen shot 2015-02-03 at 7.30.57 AM


6.) Now spray the piece with vinegar. Be generous. Let set to dry. Within fifteen minutes, you will start to see the rusting effect take place. Let this dry for several hours.

Screen shot 2015-02-03 at 7.31.58 AMScreen shot 2015-02-03 at 7.31.38 AM


7.) After it has dried, seal the piece again with the decoupage glue. Let set till dry. You can now embellish it or use it as is on your work of art.

Screen shot 2015-02-03 at 7.32.21 AM       Here are some examples of the rusted pieces, I have made and used. The left LO has rusted hearts and the swirl is rusted. The swirl is chipboard. On the right LO, I used rusted stars and swirl………the swirl is also chipboard. I attach the rusted metal pieces with pop dots or Aleene’s No Sew, Tombow and Glossy Accents.

Screen shot 2015-02-03 at 7.32.49 AM Screen shot 2015-02-03 at 7.33.06 AM


If you have any questions………..feel free to get a hold of me!

Thank you for visiting my blog to learn a new technique! Have a great day!!!

Categories: scrapbooking | 7 Comments

Create a free website or blog at WordPress.com.